Changing strings on an ukulele is regular maintenance! New strings provide:
- A fresh, clean feel
- Crisp, bright sound
- Better tuning stability
Restringing your ukulele occasionally is an important part of keeping it in top playing shape.
With good instructions and some patience, any level of DIYer can learn to string an ukulele, save time/money, and refresh the sound of their instrument.
Handy Tools
There are a couple of tools that are super helpful to have on hand when changing strings.
- Big nail clippers (the toenail ones) – by far the best way to cut and trim plastic uke strings!
- A tuner – for getting the new strings up to pitch
- (Optional) A string winder – saves lots of time winding and unwinding geared tuning pegs, but I rarely use one
Removing Old Strings
Before installing the new strings, you’ve got to get rid of the old ones!
- Loosen the tuning machine until you can pull the string out of the peg head
- Unfasten the string at the bridge and retrieve the string from the bridge hole
Be mindful of the string ends. They can scratch your ukulele if you’re not careful.
If you’re unsure about any of this, have a look at the instructions below and reverse them.
I like to cut the strings near the bridge so I can hold them over the soundhole to prevent them from kicking back. The short ends don’t move that much.
All the strings at once?
Sometimes, to clean the fretboard or make the process easier, you might want to take all the strings off of your ukulele before restringing. This is usually fine, unless the uke is structurally unsound.
Be aware that the saddle is usually held into the slot only by string tension. As soon as you take the strings off and turn the ukulele upside down, it will fall out.
Otherwise, there’s nothing wrong with replacing the strings one or two at a time.
Attaching the Strings to the Bridge
Use this navigation to go to the sections relevant to your ukulele:


Tie Style Bridge
This is the most common style of ukulele bridge. It’s easy to string and rarely fails.
Take the new string out of its pack and feed one end through the hole in the bridge. There should be three or four inches sticking out toward the ukulele’s base.

Pull this short end of the string over the top of the bridge, back towards the nut.

From the left side, wrap it under and away from you – around the long end of the string – and pull it to your right so it points away from the soundhole and neck.

Now pull the short end of string towards you and over itself.

Feed it under into the loop above the bridge.

Pull it back over towards you and feed through the loop again.


The last “under” should be set in place so that the short loose end finishes over the rear corner of the bridge. It will point at the ground when you hold the ukulele.
Large wound C or low-G strings usually only require one loop. Wound strings rarely slip so don’t fuss over getting more wraps unless you notice the string is pulling through.
While holding the bridge knot in place, pull on the long end of the string so that the knot tightens up. Babysit it so the protruding end continues to remain over the edge of the bridge.

String-Thru Style Bridge
The string-thru style bridge is the most visually elegant, but it’s the trickiest to string.
To string this style bridge, start by feeding the string down into the body, through the string hole. The internal side of the string needs to come out of the soundhole. Feed as much in as needed. You can twist as you push to help bring the string into reach.

Do not pull the string all the way through once you grab it! It has to go back the way it came and you do that by pulling the opposite end.
Slide a bead onto the soundhole side of the string.

Main thing is that the string doesn’t slip into the hole or get cut by it.

I use a 5mm “sea” glass bead with a 1mm hole for the A-string and 6mm stainless steel beads with a 1.2mm hole for everything else
Tie a Figure 8 knot at the end of the string, pull it tight, and trim the loose end short (so it can’t buzz against the inside of the ukulele). This will sit against the bead and the bead will sit up against the sound board. They work together to keep the string from pulling through the hole.

Pull the string back through the top side of the hole. Once the bead is seated in place, give the string a slow, firm tug to set the knot.

Slotted Style Bridge
Slotted bridges are common on old-school soprano ukes and are functionally similar to string-thru. The difference is that the slotted style bridge holds the knot externally and you don’t use beads.
Tie a figure-8 knot at the end of the string. Slip the string into the bridge slot and pull the knot under the overhang in the bridge. Tug to set the knot.
Pin Style Bridge
These are mostly found on vintage Martin, Kanileʻa, and various custom ukuleles. I guess they are more visually elegant than a tie-bridge, but I don’t think they offer any other upsides for how annoying they can be to deal with.
To remove the old strings, you have to pull the bridge pins out. You can do this with a bridge pin puller. Pliers will work, but tend to mar the pins.
Tie a Figure 8 knot on one end of the new string. You can slide a bead onto the string to make a more uniform mount.

Feed it into the hole in the bridge. If there is a little slot you can rest the string in, do so.

Slide the bridge pin into the hole – not too tight (if there is a groove on one side of the pin, line this up so that the string rests inside).

Pull on the long end of the string until you feel the knot settle into its home.
Push the pin in the rest of the way into the hole and continue pulling the long end until everything is tight. The friction of the peg holds the string around the corner on its little “shelf.”
Stringing an ukulele with bridge pins is a bit of a back and forth process. If you push the pin in all the way first, the string might not settle, if you pull the string too hard, the pin might not seat down all the way. Feel it out and see-saw them into place.
Attaching the Strings to the Headstock
There are two main kinds of ukulele headstocks. Choose which your ukulele has to jump to the appropriate section.


Standard Headstock
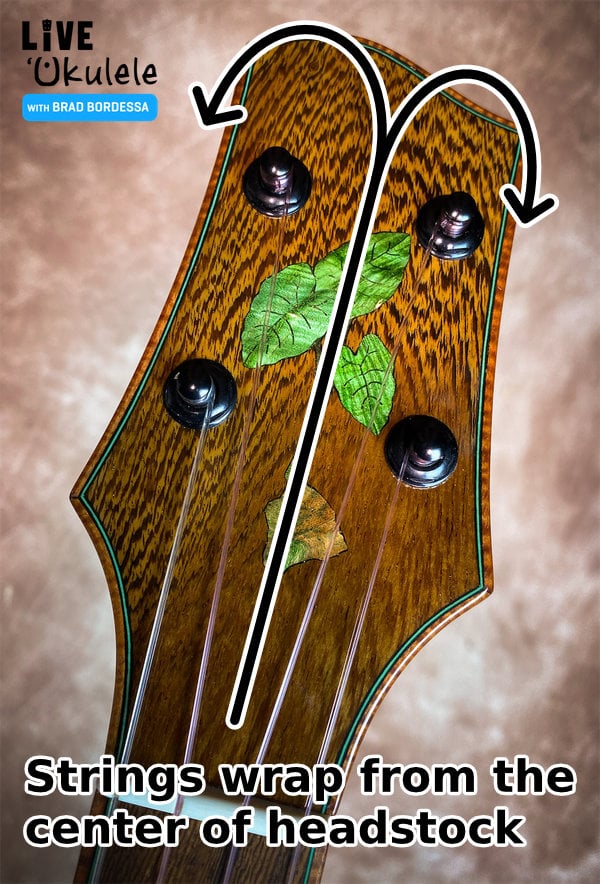
Pull the long end of the string up the length of the neck to the headstock. The string should end up in-between each set of tuning pegs. This means that every string should exit its turn on the tuning peg towards the center of the heastock.
Pull the string through the hole in the tuning peg.
In general, small strings come up to pitch slower than larger strings.
This means I pull the A string as tight as I can while I tighten it. But I give myself a couple inches of slack when tightening the low-G string. This is the most ambiguous part of changing strings and will take some experimenting.
Winding
Now place the string in the correct nut-slot and start winding the string onto the tuning peg.
The G and C tuning pegs should turn counter-clockwise as you tighten the string. The E and A pegs should turn clockwise. This keeps the strings running up the center of the headstock, like so:

This helps the strings exit the nut without taking a sharp turn, which can cause tuning trouble.
Depending on if you have friction/planetary tuners or regular geared tuners you’ll have to turn the knob a different direction. The former is easy to figure out since it’s a straight peg thru the headstock.
Geared tuners are less intuitive. Looking at them straight-on, all the knobs turn counter-clockwise to tighten the strings. But since two are pointing up and two are pointing down, it can be confusing.
Watch the string as you tighten the peg to make sure you’re going the right way!
Over/Under
The first time around the peg, the string should go over the short, protruding end. The rest of the winds should go under the short end.

This sandwiches the loose end between two tensioned wraps, holding the string from slipping.
For the smaller strings you might need to tie a knot at the tuning peg to stop the string from slipping. Check out Ukulele’s by Kawika for a diagram of the best knot (fig 4).
Slotted Headstock
Here’s my video walkthrough of how I change strings on a uke with a headstock. Standard tuning pegs are wrapped a bit differently, but there are still some applicable tips that you can apply.
Tuning to Pitch
Keep an eye on your bridge knot and the tuning peg as you increase the pitch. Put a tuner on your uke at this point and refer to it as you get the string close to where it should be.
At first, the string will slip out of tune almost as fast as you can turn the peg. As you tune it more times it will begin to settle in.
Repeat the restringing process for the rest of the set.
I usually tune up to pitch once and then move onto the other strings, returning to tune each every time I finish a new string. By the time I get to the end, the string I started with will be fairly settled.
Even after you have all the strings on and up to pitch, they will continue to stretch for a few days.
To help speed up the process, I like to play the new strings for a while, retuning as much as needed to give them a jump start. Some people just put their ukulele in the case overnight and retune the next day.
Stretching Strings
To really speed up the settling-in time, you can physically stretch the strings. This pulls the slack out of the knots and tuning peg winds and also wrings out the slack in the string itself.
However, there are differing views of thought about this. Some say that it wrecks intonation to stretch the strings and avoid doing it at all costs. Others yank on them until they stay in tune.
Personally, I adopt a middle ground and lift the string gently off the saddle and pull on it to make sure the bridge knot is cinched tight. Then I lift the string out of the nut slot and repeat the same at the tuning peg.
If you want to try stretching the entire string, you can do so by lifting it off the 12th fret an inch or two, then retuning.
Finishing Up the Job
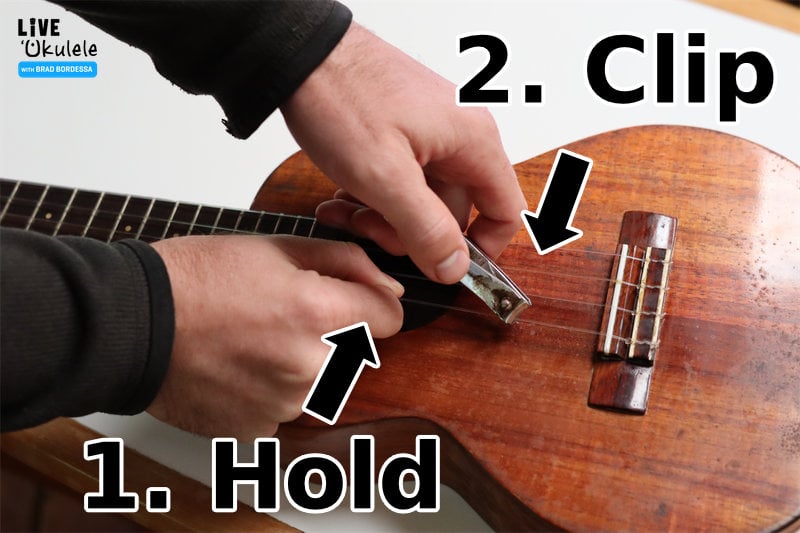
Once you know that the ukulele is holding its pitch, it’s nice to tidy things up by trimming the loose string ends.
I do this with a big pair of nail clippers. I cut the end at the tuning peg so that there’s 1/4-1/2″ of overhang (just in case the string slips a bit it won’t pull all the way out).
At the bridge I lift the loose ends up and get my clippers under them, clipping almost as close to the bridge knot as I can. This results in about 1/8-1/4″ of leftover.
If you tie your knot correctly, it’s very uncommon that the string will come loose here. Hence the short trim.
How Often Should You Change Strings?
At bare minimum, you should change your ukulele’s strings when they become hard to tune.
An old set of strings needs tuning much more often than a new one. Even when you can get them in tune, they still don’t sound quite right and the intonation is off.
Other indicators are more obvious.
When a string breaks, unless the set is brand new, it’s a good opportunity to replace all of the strings.
A little bit of wear over the frets is okay, but when the string is obviously fraying or split, it’s time to change. Worn strings are more likely to buzz and fail, and it hurts like crazy if your hand is in the way when a string snaps!
Even if you don’t notice the above signs, putting a new set of strings on your uke will result in a fresh sound. This can be very inspiring!
Some people change strings every week to always have the most accurate sound. On the other hand, some people wait years before changing strings!
Becoming an Experienced Ukulele String Changer
Changing strings is an art. It takes time and experience to do it well.
You’ll feel awkward and clunky the first time you do it. But once you’ve done a handful of string changes you’ll start to get the hang of it.
After doing it so long I can usually do a string change in 10-15 minutes, no problem. You’ll get just as fast and find your own tricks for making the job better and easier.
For more reference, Aldrine does a good job explaining how to change strings in this video: