 The average ukulele player puts a lot of hard work into learning ukulele chords and how to switch between them. But oftentimes I see beginners working harder than they need to with certain changes!
This short lesson will give you some tips to make switching fingers easier.
Look Ahead
The truth is, once you get your fingers in place for a chord, you don’t need to think about holding the chord any longer. Simply keep your fingers under pressure and the notes will continue to ring.
There’s no reason not to anticipate what the next chord is going to be. By thinking about it in your head and planning on what moves you’re going to have to make to switch your fingers, you can be much more prepared when the time comes to change the chord.
Quick changes that happen on the beat or every other beat might not allow for such planning ahead and will still trip you up. But for any song that only moves through chords once in a bar, I think you’ll find that you can switch chords much faster.
When I make this recommendation to my beginning students I see an immediate improvement in their ability to follow along in most easy ukulele songs. Instead of focusing on the chord they’re on, they become aware of what needs to happen next and where the ukulele part is going to move to.
Hover Over The Board
An addition to the “look ahead” concept would be to hover your fingers over the next location they’re going to need to be placed.
Any fingers that are not being used to hold a chord can be shifted to a “ready” position above the next fret they will play.
A simple example would be if I’m holding an A minor chord and I want to change to F. While holding A minor with my middle finger on the second fret, top string, I simply hover my index finger over the first fret on the E-string.
This allows me to “plop” the finger down when it’s time to change chords and not headache over the fretting of F (think I missed a pun there). In this way I can sort of do the groundwork before the chord change even happens.
String It Together
The first place to connect the dots between ‘ukulele chords is along a string’s path. When a finger stays upon the same string but shifts frets in the next chord, simply leave that finger on the string. Just lift up slightly, shift, and then press down again.
 For instance, changing from a C chord to a G7 chord is a tough change for beginning players. But using this technique you can save mental space by leaving the third finger on the bottom string.
Since the proper fingering technique uses the third finger for playing a C chord, you can leave that finger on the string when you switch to G7. Simply slide the 3rd finger down one fret on the string and then add the other two fingers (possibly with the “hover” technique?) to complete the shape.
When switching back to C, do the opposite.
Another example to help you understand the concept is a G to D7 change. Please note that I’m referring to the Hawaiian D7 which is fingered: 2020.
Proper fretting technique for a G chord puts your first finger on the second fret of the C-string, the middle finger on the second fret of the A-string, and the third finger on the third fret of the E-string. Now, to change to a D7 I will leave my third finger on the E-string. Lift up the first two fingers, slide the third finger down one fret, and add my middle finger on the top string, second fret.
The reverse is true for going from D7 back to G.
Shared Frets
While the same-string method is very useful, it’s rare enough that we need an alternative for additional easy chord visualization and movement. This comes to us via the magical metal fret lines.
When changing between chords that share a finger on the same fret you can use this as a memorization device. All you need to do is hop the finger over to the next string to make the change.
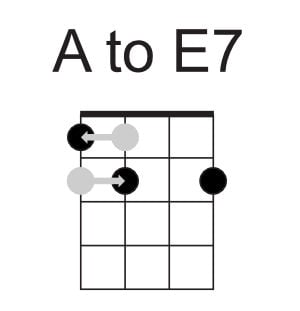 Say I wanted to change from an A major chord to an E7 chord. Since there are no practical places that I can slide one finger up or down a string to make the change, I need to look for alternatives.
The most obvious one is sharing my middle finger on the second fret of the top string in the A chord with the second fret on the C-string for E7. This is also true for my first finger on the first fret of the C-string in the A chord. I can simply hop this finger up to the top string to create the foundation of E7.
Conclusion
So there you have it. Some easy, simple techniques to supercharge the chord changes you make on your ukulele. These are by no means the only devices to ease your workload, but are some of the most straightforward with the biggest benefit-to-effort ratio.
You might also want to read this article on making difficult uke chords easier.
Want to learn more ukulele chords? My 55-page eBook teaches you how to play over 2,000 chords AND how to understand the fretboard while you’re at it.