Welina mai! Welcome to Live Ukulele! My name is Brad and in this ukulele lesson I’m going to help you get started playing the uke.
This lesson assumes you’re a total newbie who doesn’t know anything about playing the ukulele. If you have played a little bit however, there still might be some interesting things for you to learn.
An Intro to the Ukulele
The ukulele is a four-stringed fretted instrument with origins in Hawaiʻi.
Portuguese immigrants arrived to Hawaiʻi in 1878 to work the sugar cane fields. They brought with them their traditional instruments, the braguinha and rajão. Elements from these instruments were combined to create the instrument we know today as the ukulele.
In Hawaiʻi, we say “oo-koo-leh-leh.” I live here so that’s what I use and you’ll see me write “an ukulele” instead of “a ukulele” because that’s what sounds right in my head.
In the USA and UK, people tend to say “you-ka-lay-lee.”
Either way, I encourage you to check out my in-depth article on pronunciation for the complete picture and some important context.
Ukulele Sizes
There are four main sizes of ukulele. From small to large they are:
- Soprano
- Concert
- Tenor
- Baritone
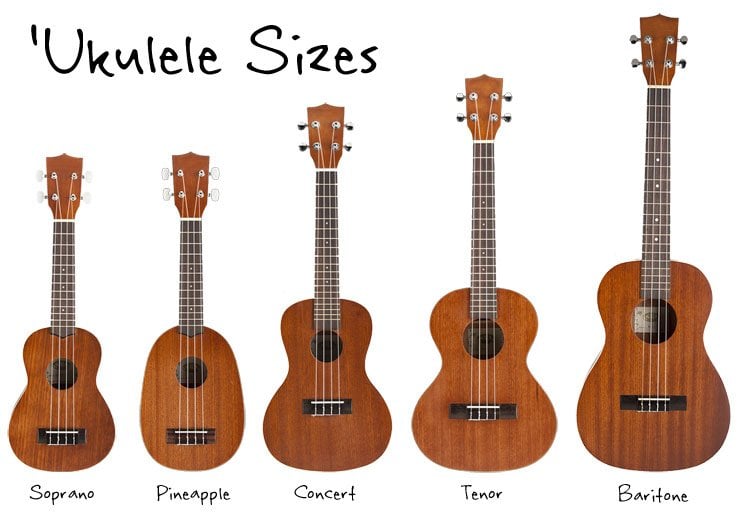
The “pineapple” size is a variation on the soprano
Concert size is a nice Goldilocks fit for size and sound since it sits in the middle of the lineup.
The tenor size is a contemporary favorite. It has a longer string scale (ringing length) that makes it very articulate and clear sounding, which is great for fingerpicking arrangements. The tenor ukulele is a favorite among performing professionals.
The baritone size is the most obviously different because it typically uses a lower tuning: DGBE. Because of its large body, it has a deep, rich sound and large fret spacing. The tuning is also exactly the same as the bottom four strings of a guitar so it’s a common transition size for experimenting guitarists.
Which size you choose depends mainly on the sound and feel you want from your uke. A smaller size has a brighter sound and tighter fret spacing. A larger size has a more full tone and more room for your fingers.
If you’re not sure what size ukulele to get, a concert uke is a great place to start.
Parts of the Ukulele
The ukulele is made up of a number of parts (mostly wooden) glued together to form a whole instrument.
Knowing the names of some key parts will help you follow instructions better. Here’s an image of the very basics for now:

Buying An Ukulele:
You need a simple ukulele to get started practicing.
Especially these days, you can find quality instruments for a very budget-friendly price.
If you have to order online, an ukulele-specific dealer like Hawai’i Music Supply or MIM’s Ukes will take better care of you and make sure you get an ukulele that’s easy to play, right out of the box.
At the end of the day, in my opinion, the best ukulele for a beginner is a concert that costs around $100-200. My reasons:
- Spending at least $100 will get you a quality instrument, while staying under $200 will minimize your losses if you decide that ukulele just isn’t for you
- A concert might not be the perfect size for you, but it’s usually good enough and will give you a middle-of-the-road reference point for whether you want to go smaller or bigger
- Owning and playing a uke will help you learn what you like/dislike about the instrument; staying within a modest budget will help you save funds for when you are, inevitably, ready for an upgrade to something better
This is, of course, not a hard and fast rule and you should get any ukulele that feels comfortable and is going to make you excited about learning to play.
How to Hold it
Your technique doesn’t need to be perfect to get started playing, but you do need to know which end points where.
If you’re going to play right handed, the neck points to the left and your left hand holds the frets.

Your right hand leans/drapes over so that you can touch the strings between the soundhole and where the neck meets the body.

Here’s a great video from James Hill on how NOT to hold your ukulele:
Keep in mind that if you do flip the ukulele over and play it truly left handed, you’re going to need to convert other learning resources. You can find some simple charts to get started, like this one, but, for the most part, there aren’t a lot of left hand-specific lessons.
Tuning
Unlike a piano which, once tuned, remains stable for many months or years at a time, an ukulele easily drifts out of pitch depending on the strings and environment, along with several other factors.
A typical ukulele is tuned to G C E A from the top string, closest to your face, to the bottom string, closest to the floor.
The G-string is tuned one of two ways:
- High-g: to the G note above middle C. This makes the tuning “re-entrant” – from high to low to high
- Low-G: to the G note below middle C. This makes the tuning “linear” – from low to high
Ukuleles are usually strung with plastic strings. These are usually made from nylon or variations on fluorocarbon fishing line.
Sometimes you’ll see a “wound” low-G or C-string. These have a nylon filament core wrapped in metal. Unlike steel core strings, these ukulele-specific wound strings have a similar tension to plastic strings.

You’ll probably want to start by learning to tune with an electronic tuner. Much more on how to do that in this lesson.
Here’s a visual cheat-sheet:

Basically, if the indicator is to the left of center, the string is flat. If it’s to the right, it’s sharp. Centered is in tune.
The trick is to make sure you’re tuning to the correct note in the correct octave. It doesn’t matter if your string is “in tune” if it’s tuned to the wrong note.
Here’s a video demonstration:
As you’re learning to tune, it will take you a while to figure out how to adjust the strings. The more you do it, the faster you’ll get until it takes 10 seconds or less and then you can play!
Making Music
Once you’re in tune, you can start learning a couple chords.
Pressing frets
When you press a finger from your left hand into the space between the fret wires, you shorten the string. This raises the pitch of the note.

Press in the fret space corresponding to the fret number. If you’re told to press the 3rd fret, press in the 3rd fret space from the nut (the top end of the fretboard that holds the strings in slots).
Since strumming chords allows you to sing along with your uke, it’s often the most rewarding and common place to start learning the ukulele.
Playing a chord
A chord is made up of several notes played together to create a harmony sound. This harmony complements the melody (singing) in a song.
To play a chord on your ukulele, your left hand fingers are going to hold down a combination of frets and the right hand fingers are going to strum by brushing down through all the strings.
Let’s start with a one finger chord called C7. To play it, place your index finger on the 1st fret of the bottom, A-string.

Now, while holding the C7 in place with your left hand, brush the thumb of your right hand down the strings repeatedly. Here are some tips for the thumb brush style:
Once you’ve got the proper motion, try to get a steady beat going. If you can count “1…2…3…4…” evenly and strum down on each number, you’ll be in good shape.
To play a song, we’ll need another chord so that we can rock back and forth between them – an F chord! It looks like this:

To play F on your ukulele, hop your index finger up one string towards the ceiling from C7. This will move it to the 1st fret of the second string from the bottom (the E-string).
Now, add your middle finger on the top, G-string, 2nd fret to complete the F chord. Here’s a video example of F:
Again, strum this chord with a steady beat for practice.
The four vertical lines are the strings, the horizontal lines are the frets. A dot shows where you put your finger.
Here are the two chords we’ve learned so far:

C7

F
Chord Changes
Once you’re comfortable playing C7 and F individually, try moving between them for a chord change.
Continue counting “1…2…3…4…” evenly as you play the chords. Strum C7 for eight counts (two counts of four). Then, jump to the F for eight counts.
The goal is to retain the timing so you can continue counting from “1” when you change chords, but you’ll probably need to pause and rearrange your fingers at first.
As you get more comfortable, try to keep the momentum so you don’t pause between chords.
Once it’s easy to go back and forth from C7 to F every eight counts, try switching every four counts. You’ll only have half as long to prepare!
Playing a song
With the C7 and F chords, you can play a ton of songs on the ukulele. For starters though, it’s best to keep it really simple.
Now that you have a strum and some chord changes, putting it all together can be simplified by using a familiar tune such as a children’s nursery rhyme.
Choose one of the first five songs on this page of songs that only use F and C7. These are the easiest and probably most familiar of the bunch.
For example, let’s use:
Itsy Bitsy Spider
    F                      C7           F
The itsy bitsy spider went up the water spout
F                      C7                F
Down came the rain and washed the spider out
F                    C7               F
Out came the sun and dried up all the rain
        F                      C7            F
and the itsy bitsy spider went up the spout again
Sing the words and strum, changing the chords over the corresponding syllable.
Because this style lyric/chord sheet can’t convey rhythm or melody, it’s super important to know the song really well in your head. My general rule is, if you can’t hum or sing it confidently, you shouldn’t be trying to play it on your ukulele when there are so many other aspects to be thinking about
It could change at the beginning:
F
Love
At the end:
   F
Love
Over a drawn-out “o” (which isn’t usually written out – “looooooooove” will still look like “love” on the sheet):
   F
Looooooooove
Over a drawn-out “e”:
          F
Loveeeeeeeeeee
You get the idea, the chord change could go anywhere…
So how do you know when to change? Feel the rhythm (1…2…3…4…) and change on the 1 beat (or sometimes the 3 beat). Most chord changes happen at the beginning of the bar.
This keeps what you’re singing and what you’re playing completely separate (which they should be!).
Here’s a quick play-along for Itsy Bitsy Spider using the chords and strum we’ve already talked about (skip to :45):
In the video above, she has the chords notated according to the strum (one diagram box per strum). This is not typical and you would usually just assume that you continue the strum, only changing chords when shown.
What to Practice
Now that you have some ukulele skills under your belt, how do you progress?
Way too often I see folks rush ahead to playing songs that are “cool” or “fun.” This can work, but really mastering simple fundamentals now will increase the speed of your progress later.
Since you’re just starting out, you want to build a strong foundation of understanding and skill. The player who learns to play something well – even if it’s super simple – sounds better than the player who jumps to something more advanced and sucks at it.
So if I was your regular teacher, I would encourage your to improve what you’ve already learned and slowly add variations to it.
What does this best? New songs with the same chords! If you wanted to be really thorough, you should/could work through every song you know on the page of songs that only use F and C7.
Having these similar sandbox songs to play with allows you to fine-tune your chord changing, strumming, holding of the ukulele, and other little skills that you don’t want to muddle through.
As you play more of them on your ukulele, they’ll get easier and easier as the movements and muscle memory have a chance to settle in. There’s no rush! Find the joy and fun in creating this simple music.
Once you’re comfortable with everything discussed on this page, you can move on to adding some more chord shapes and working on the next level of strumming.